On this page
A few weeks back, we’ve shared with you 5 Digital Don’ts – What Not To Do In Digital Marketing. Today, we’re sharing with you the tools needed to Check Your Website Health and Fix these 5 mistakes.
Let’s set the scene; your website has had good traffic and conversions until leads start to steadily decline. It doesn’t seem to be linked to a seasonal trend nor an event out of your control, so what’s happening?
Well, it is time for you to review the health of your website’s backend and fix what’s needing fixing.
1. Have Irrelevant Website Pages Been Deleted Incorrectly?
Ok, cleaning up a website of irrelevant pages is always a good idea, however, deleting old blog posts or services that you do not offer any more can affect your visits and rankings if the appropriate redirection is not put in place.
In fact, it is imperative to implement 301 redirects from the URL of the page being deleted to the URL of the next most relevant page to help maintain both the authority and visits the deleted page was getting.
A 301 status code is a server-side redirect that sends users and search engines to a new permanent location. 301 redirects are useful when sending a redundant/outdated URL to a new URL.
1a. How To Check if Pages Were Deleted Incorrectly?
Here, you are actually looking for 404 pages, which are dead ends, pages without redirection that end up nowhere.
The most efficient way to check for it is to use a crawling tool. We recommend using Google Search Console’s Index > Coverage tab to the 4xx errors, or look under Enhancements > AMP if AMP is set up. You could also use the Screaming Frog free plugin to do so, however, please note that only 500 pages are crawled per website on the free version.

Google Search Console: AMP
We like to also check the SEMrush Site Audit (paid tool) to find such issues. The affected pages will be flagged as ‘4xx errors’.
1b. How To Fix 404 Pages with a 301 Redirect Plugin?
In order to fix 404 pages, you need to implement 301 redirects to tell search engines you have permanently moved this page to a new URL. Implementing a 301 redirect can be achieved in many ways, one way is through a plugin.
Step 1: Find Redirects in your CMS Settings. For WordPress sites, it can be found under Tools and sometimes Redirection or 301 Redirects.
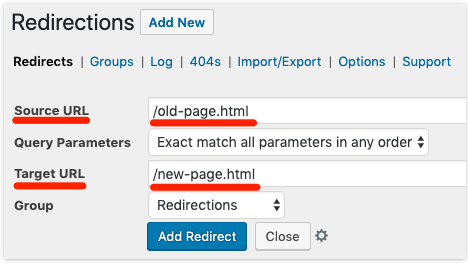
Step 2: Click on ‘Add New’ and add the 404 page in ‘Source URL’ and the relevant page you want it to redirect to in ‘Target URL’. Then click ‘Add Redirect’.

WordPress Redirections Plugin
1c. How to Fix 404 Pages with a 301 Redirect in the .htaccess File?
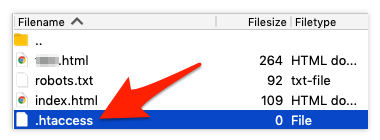
Another way to implement a 301 redirect is to edit your site’s .htaccess file. This is for Apache servers only. You’ll find this in your site’s root folder. Find your root folder by accessing your domains control panel.
Look for the root directory, usually a “C:\”. You can also click on the folder or File Manager to view the inside of the root directory.

.htaccess File Format on File Manager
Don’t see the file? That means one of two things:
- You don’t have a .htaccess file. Using Notepad (Windows) or TextEdit (Mac), create a new document and save it as .htaccess. Be sure to remove the standard .txt file extension.
- Your site isn’t running on an Apache web server. Check if your website runs on Apache by asking your web host.
Add the following snippet to redirect an old page to a new page.

301 Redirect Implemented on .htaccess
IMPORTANT: These instructions are for Apache web servers only. Read this if your site runs on Nginx, or this if your site runs on Windows/IIS.
Redirecting using these steps will prevent users from landing on dead-end (404) pages as well as prevent rank and visibility losses.
2. Is The Sitemap Submitted Still Correct?
A sitemap is a map of pages that search engines crawl to find which of your website pages and files are to be prioritised. In other words, they are crucial for ranking on search engines. Sitemaps also provide important information about these pages, when they were last updated and if they are any alternate language version, etc.
That is why every time your website URLs are updated, new pages are created and old pages are deleted, your sitemap needs to be re-submitted. It is also the case when an SSL certificate gets implemented (HTTP to HTTPS) and when the www version of the website is updated to the non-www. version or vice-versa, as the website URLs are consequently updated.
2a. How To Check if The Submitted Sitemap is Still Correct?
First, access your sitemap by typing your full domain URL and enter either of the following URL extensions.
Sitemap Examples:
- www.example.com.au/sitemap.xml
- www.example.com.au/sitemap
- www.example.com.au/sitemap_index.xml
- www.example.com.au/robots.txt
Note: If you do not have a sitemap and use WordPress, you can add plugins such as Google XML Sitemaps or Yoast SEO.
Next, check whether the sitemap is accurate, or if any have been submitted.
To do this, you will need to log into your Google Search Console account. Under ‘Index’ > ‘Sitemaps’, open your sitemap and check if all relevant URLs (pages/posts/products/etc.) are indexed.
2b. How To Fix an Incorrect Submitted Sitemap?
If the sitemap is incorrect, you will first need to update the sitemap prior to submitting again. To update it to the correct version, you will need to download your sitemap in a sitemap.xml file, rework it to the latest version by modifying/adding/deleting URLs, and upload it to the hosting control panel (such as cPanel) or using your FTP account.
Whether the incorrect sitemap or no sitemap is submitted at all, you will need to log into your Google Search Console account and go under ‘Index’ > ‘Sitemaps’ and (re-)enter your sitemap URL.


Entering New Sitemap on Google Search Console
3. Have You Been Ignoring The HTML Tag Optimisation?
When applying the right SEO tags to your website page HTML (code), you’re telling search engines what on page content is actually about. This supports search engines’ categorisation and indexing of your pages and ultimately helps improve search visibility.
HTML Tags include Title, Meta Description, Header, Nofollow Link, Links, Anchor Text, Canonical and Image Alt tags, which all have significant impacts on rankings.
3a. How To Check if The HTML Tags Are Optimised?
In order to look for HTML tags, you could check each page, post, image etc. manually in your CMS and go through the list of tags and ensure it is properly filled. This is very time consuming. Alternatively, you can use an SEO Audit tool to crawl the HTML tags. Digilari’s tool of choice is the SEMrush Audit Report (paid tool). It will outline all HTML tag issues present on your website.
3b. How To Optimise HTML Tags?
Once you have a list of all tags that are missing or have errors (duplicate, too short/long, etc), you will need to optimise them manually one by one or using a spreadsheet importation.
Key Optimisations Include:
- Review and update ‘duplicate’ title tags and meta descriptions with unique and relevant ones.
- Ensure each tag includes your primary keyword. Do not keyword stuff.
- Place important keywords at the beginning of the title or meta description
- Include your brand name
- Ensure your title tag does not exceed 60 characters
- Ensure your meta description does not exceed 155 cha
- Write tags for your audience. Think about the users search and what is the intent of the search. Add a compelling call to action to drive conversion.
- The list goes on for Headers, tags being too short or too long, etc.
4. Is Your SSL Certificate Out of Date?
SSL certificates’ purpose is to make your website secure for visitors to browse. SSL certificates can offer different levels of encryption and are a huge ranking factor.
Using outdated SSL certificates represent a security issue that will be flagged by Google to the visitors as they will be shown an error message saying ‘Unsecure Website’. This will prevent most of the visitors from actually landing on your website, which will ultimately impact your rankings.
4a. How To Check If Your SSL Certificate is Out of Date?
To check whether your SLL certificate is out of date and figure out its date of expiry, you can access your website and check whether there is a padlock on the left of your URL in the search bar.
Digilari SSL Certificate Padlock
If so, your website is secure, if not, you would see a warning sign followed by ‘No secure’. If not secure, you would need to click ‘Hide Advanced’ and follow-through from the warning page to the website. There, click on the padlock or warning sign and you will be shown next to ‘Certificate’ written either ‘(Valid)’ or ‘(Invalid)’.
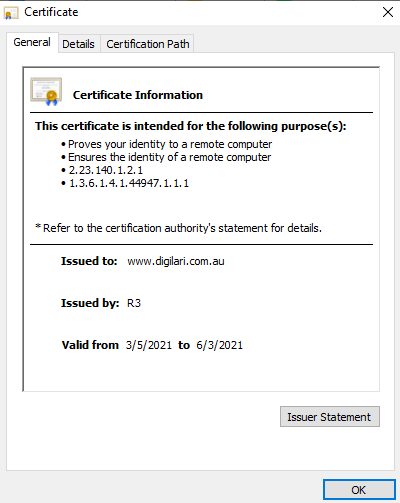
To find when the expiry date is, click on the ‘Certificate’ and you will see the ‘Valid from … to …’ dates and the SSL certificate issuer.

Digilari SSL Certificate Details
4b. How To Fix Outdated SSL Certificates?
To fix an SSL certificate, you will need to be a developer, or have access to one. In fact, we have a 26 page PDF ready for you if you need to learn how to implement or fix an SSL certificate. The PDF describes different types of paid and free certificates and various accesses from which to implement them.
Please contact us to request the PDF.
5. Have You Been Ignoring The State of Your Backlinks?
Websites’ Authority is measured through the high-quality backlinks leading and referring to them as they act as votes of confidence that your content is valuable.
Backlinks are inbound links sitting on another website that direct traffic to your website. Gaining high-quality backlinks generate a good level of potential referral traffic and grant your website greater Authority.
Nevertheless, it is not an easy task to implement backlinks and there are pitfalls to avoid when it comes to seeking backlinks. Firstly, getting poor-quality or irrelevant backlinks will be picked up by search engines and will not improve your Authority. Similarly, allowing toxic backlinks to remain connected to your website will hinder your Authority and might open the door to potential hacking activity. Lastly, not fixing high-quality backlinks once they break (when your URL changes or their referring page is modified) will hinder your Authority as you will lose quality link-juice and referral traffic.
5a. How To Check The State of Your Backlinks?
To check the backlink state of a website, Digilari’s favourite tools are Ahrefs (paid tool with free version) and SEMrush (paid tool). The Google Search Console, under ‘Links’ > ‘Top Linking Sites’, also offers the number of unique links to your property from outside your property, however, it does not provide insights about their quality.
Backlinks audits provide insights into the quality of the referring domain, how many other domains they refer to, and their estimated organic traffic. They also provide a gauge of their potential toxicity through a toxic score. The Toxic and Potentially Toxic backlinks need to be manually reviewed by checking the referring website and page the link is found.
5b. How To Fix Your Backlinks?
If you find backlink(s) that need to be deleted as they are toxic (harmful to your site), compile them. The first action to take would be to contact the administrator of the linking site and request them to remove the link to your website. If the administrator does not delete the link(s), you can then use the Google Search Console Disavowing Tool, however, Google warns that this is an advanced feature that should be used caution.

Google Search Console Disavowing Tool Warning
From there, once you deem worthy to disavow the toxic link(s), create a list of links to disavow by downloading them from the Ahrefs or SEMrush backlink audit tools, or manually in a text file by specifying one URL or domain to disavow per line, following Google guidelines.
Then, return to the Disavowing Tool, select your property and upload your disavow list for the first time or to replace the past one.

Google Search Console Disavowing List Upload
There you go, you now know how to find and fix the 5 commonly overlooked technical issues that have the potential to hinder your website’s performance.
In our next Digital Don’ts article, we will cover some real issues when it comes to your actual approach to marketing in a digital area. We’ll discuss the Digital Don’ts that stop you from being human, specific, fast, remarkable, informative, active, smart and a lot of other errors we have seen businesses make.
In the meantime, if you have any questions about these issues or are experiencing slower enquiry levels would like us to take a look under the hood, we’d be happy to have a chat! Simply click the button below to schedule your complimentary no-obligation assessment session. We’ll be in touch from there.


